Tutorials
This page shows the applications of MRF on various objects. You can download the data and implement MRF by yourself. All files and notebooks can be found here.
NGC 5907
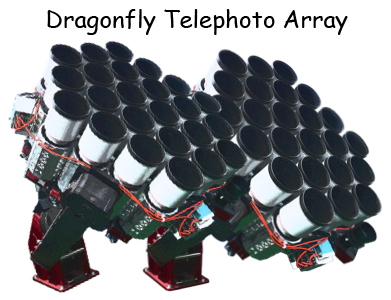
NGC 5907 is an edge-on spiral galaxy, which is famous for its prominent tidal streams. Recently the images taken by Dragonfly Telephoto Array reveal more details about the low surface brightness features around this galaxy (van Dokkum et al. 2019). In this paper, we isolate diffuse low surface brightness streams using “Multi-Resolution Filtering” (MRF). Now we show how to do it using Python package mrf. Check this notebook for the whole process of MRF using this Python package. We briefly show the key steps below.
Dragonfly images in g and r band can be found here along with MRF results. The corresponding CFHT images can be found in Canadian Astronomy Data Center. Besides, mrf provides functions to download high-resolution images (including CFHT, DECaLS and HSC), shown as follows:
# Position of NGC 5907
ra, dec = 228.974042, 56.328771

# Notice: the images might be very large (several Gb)!
from mrf import download
download.download_highres('n5907_df_g.fits', high_res='cfht', band='g')
download.download_highres('n5907_df_r.fits', high_res='cfht', band='r')
# CFHT images will be saved as "CFHT_megapipe_img_G.fits"
# and "CFHT_megapipe_img_R.fits".
After downloading high-resolution images, you need to bin it by a \(2\times2\) pixel box and convolve with a \(\sigma=1\) pixel 2-D Gaussian kernel to mitigate projection errors.
from mrf.celestial import Celestial
from astropy.convolution import convolve, Gaussian2DKernel
hdu = fits.open('CFHT_megapipe_img_G.fits')
cfht = Celestial(hdu[0].data, header=hdu[0].header)
hdu.close()
cfht.resize_image(0.5) # bin with 2*2 box
cfht.image = convolve(cfht.image, Gaussian2DKernel(1))
cfht.save_to_fits('ngc5907_cfht_g.fits')
# Then do the same thing for R-band image
The main part of MRF can be simply done by the following code. A configuration YAML file is needed to provide parameters for relevant functions such as SExtractor (sep). Check here for more explanation on the configuration file. If you want to retain certain galaxies during MRF, make an ASCII file which contains the RA and DEC of galaxies (see gal_cat_n5907.txt for an example). If you don’t want to preserve any galaxy, just leave certain_gal_cat = None. We have options to skip those time-consuming steps if you want to have a quick iteration over one parameter in the configuration file. Use wide_psf=True to have a better subtraction of scattered lights from bright stars.
from mrf.task import MrfTask
task = MrfTask('ngc5907-task.yaml')
img_lowres = 'n5907_df_g.fits'
img_hires_b = 'ngc5907_cfht_g.fits'
img_hires_r = 'ngc5907_cfht_r.fits'
certain_gal_cat = 'gal_cat_n5907.txt'
results = task.run(img_lowres, img_hires_b, img_hires_r, certain_gal_cat, wide_psf=True,
                   output_name='n5907_g', verbose=True, skip_resize=False,
                   skip_SE=False, skip_mast=False)
The surface brightness limit calculated by mrf.sbcontrast.cal_sbcontrast will be printed out as a part of MRF results, as follows:
- Binning factors: dx = 24, dy = 24
- Used bin area / True bin area = 1.00000
- 1-sigma variation in counts = 0.2588 +- 0.0090
- Surface brightness limit on 60 arcsec scale is 30.4290 +- 0.0518
results has many attributes including the MRF results results.lowres_final, the mask results.lowres_mask, the models results.lowres_model, the convolution kernel results.kernel_med, the stacked PSF results.PSF, etc.
Warning
Incorrect pixel scale could yield completely wrong results. Be aware of the pixel scale of the image you are processing, and pass the pixel scale to the functions in time.
import matplotlib.pyplot as plt
fig, [ax1, ax2, ax3] = plt.subplots(1, 3, figsize=(15, 8))

ax1 = display_single(results.lowres_input.image, ax=ax1,
    pixel_scale=2.5, scale_bar_length=300, scale_bar_y_offset=0.3,
    add_text='NGC\, 5907', text_y_offset=0.65)

ax2 = display_single(results.lowres_model.image, ax=ax2,
    scale_bar=False, add_text='Model', text_y_offset=0.65)

ax3 = display_single(results.lowres_final.image, ax=ax3,
    scale_bar=False, add_text='Redisual', text_y_offset=0.65)

plt.subplots_adjust(wspace=0.05)
plt.savefig('n5907-demo.png', bbox_inches='tight', facecolor='silver')
plt.show()
You can adjust the mask size after running MRF using function mrf.utils.adjust_mask as follows. You can tweak parameters until you are satisfied with the results. Both the mask and the masked image will be saved instantaneously.
from mrf.utils import adjust_mask
results = adjust_mask(results, gaussian_threshold=0.002,
                      gaussian_radius=1.5, bright_lim=14, r=10)
M101-DF3
M101-DF3 is a satellite galaxy of the famous spiral galaxy M101, presented in Merritt, van Dokkum, & Abraham 2014. It has an effective surface brightness \(\mu_g=27.4\pm0.2\) and effective radius \(r_e=30\pm 3\) arcsec.
The Dragonfly r band image of M101-DF3 and CFHT counterpart can be found here (google drive link). In this example, the dwarf galaxy M101-DF3 is revealed clearly by MRF after subtracting compact objects and bright star halos according to van Dokkum et al. (2019) . The basic procedures are the same as NGC 5907 example. Check this notebook for more details.
After having results, you can show the flux model, kernels and stacked PSF as follows.
fig, [ax1, ax2] = plt.subplots(1, 2, figsize=(15, 8))
ax1 = display_single(results.lowres_input.image, ax=ax1,
                     scale_bar=False, add_text='Kernel')
ax2 = display_single(results.hires_fluxmod, ax=ax2,
                     scale='percentile', lower_percentile=0.5,
                     scale_bar=False, add_text='FLux\,Model')
plt.savefig('m101-df3-fluxmodel.png', bbox_inches='tight')
plt.show()
fig, [ax1, ax2] = plt.subplots(1, 2, figsize=(15, 8))
ax1 = display_single(results.kernel_med, ax=ax1,
                    scale_bar=False, add_text='Kernel')
ax2 = display_single(results.PSF, ax=ax2,
                    scale_bar=False, add_text='PSF')
plt.savefig('m101-df3-kernel-psf.png', bbox_inches='tight')
plt.show()
Self-MRF and Cross-MRF
In many cases, high-resolution images (such as DECaLS, HSC, CFHT) are easier to find than intrinsically low-resolution images such as Dragonfly. However the philosophy of MRF still stands even if no Dragonfly data is available. An artificial low-resolution image can be made by binning high-resolution image and then convolve with a kernel. The kernel can be tuned to the particular structures that the user intends to isolate. Based on our tests, a kernel with Sersic index = 1 (exponential) works well for isolating extended dwarf galaxies.
We refer “self-MRF” to be the case where the high-resolution image is the same one as what the low-resolution image is made from. However, artifacts in high-resolution image pass to low-resolution image and cause spurious discoveries. Therefore two overlapped high-resolution datasets can be used in this situation, and we call this “cross-MRF”. The dataset with the best low surface brightness sensitivity can be used for making low-resolution image. An important advantage over self-MRF is that artifacts (such as diffraction spikes) are usually not present at the same location in two independent datasets. Check out demonstration of self-MRF and cross-MRF!
Run with script
You can also use this script to run the MRF task. Take NGC 5907 as an example: (notice that you should copy the following command as one line)
python mrf-task.py n5907_df_g.fits ngc5907_cfht_g.fits
ngc5907_cfht_r.fits ngc5907-task.yaml --galcat='gal_cat_n5907.txt'
--output='n5907_g'


